| injun #576871 |
 |
| injun #576871 |
|
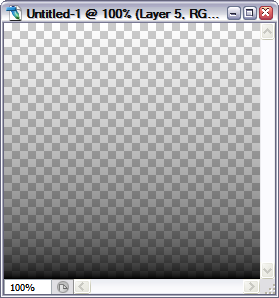
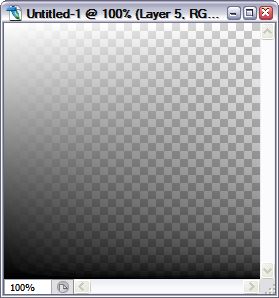
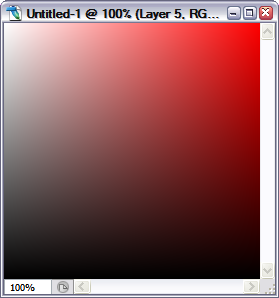
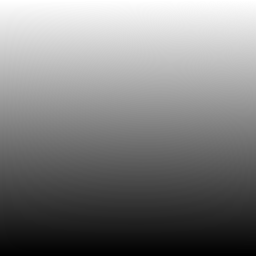
How to Create a Color Picker in JavaScript By Mark Kahn. This week you're going to learn how to create a Color Picker similar to the one used in Photoshop, but entirely in JavaScript! How Colors Work on a Computer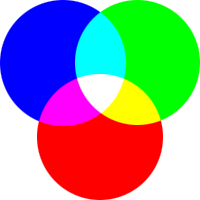 Light Primaries  Paint Primaries Before we start making our color picker we need to briefly go over colors and how they work on a computer. Every color you see on your screen is made up of 3 primary light colors: Red, Green and Blue. The absence of these colors leaves Black, and the union of all 3 of these colors creates White. If you have ever seen a rainbow or a prism in action you have seen how white light breaks apart into different colors. The image on your left demonstrates what happens when you mix these 3 colors. At this point there are some of you saying "Wait, I was taught that the 3 primary colors were Cyan, Magenta and Yellow". Well those are also the primary colors, but they are the primaries for paint, not light. What's the difference? Well the primaries for light are for emitting light. The primaries for paint are for absorbing light. Back to our RGB primaries. Any color you see on your computer is made by mixing a certain amount of Red, Green and Blue light. The amount of each color varies from 0 to 255. To get darker colors you lower the amount of each color of light. To get lighter colors you raise the amount of each color. If all 3 are set to 255, we have white light. Now that we know the basics of computer colors, we can start to create our own color picker. Figuring Out What's NecessaryTo start, let's take a look at Photoshop's color picker to see what we're up against. As you can see from the two images below, there's a lot here. We don't need to implement everything that Photoshop does, however, we're only going to choose the features we need. 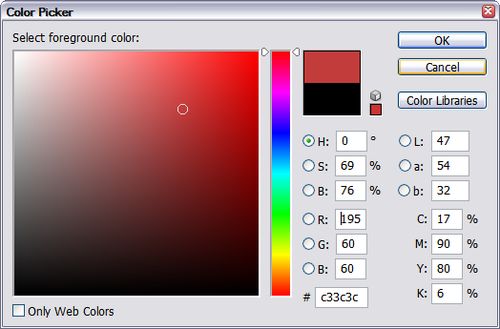 Take a look at the larger of Photoshop's two color picker tools. What do we need here? Well any color on the internet is going to be a HEX RGB color. So the R, G, B and # boxes (# stands for HEX #) on our image stay. All of the other inputs: H, S, B and L, A, B and C, M, Y, K can go. We probably won't need them and the extra effort to implement them isn't worth it. The "Color Libraries" button goes to another window that we don't need here: it pulls up a list of PANTONE, etc colors. So we are left with the large color window, the color slider, the R, G and B inputs and the options for web colors. 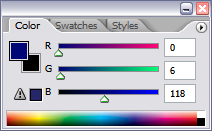 Looking at the smaller window we see a nice little interface. Most of its functionality, however, is duplicated in the larger window. The one thing that would be nice to have, however, is the color bar at the bottom. This way we can make a mini color picker and a full blown color picker, all in the same tool. Creating the Color GradientNow that we know what we are going to do we need to figure out how to do it. If you happen to have Photoshop, open it up and open the color picker. If you don't have Photoshop you can get a free copy of a program called GIMP which has very similiar functionality to Photoshop. Anyway, once you have the color picker open in one of these two programs try moving around the color slider. You'll notice that the larger color picker is changing it's HUE, but the saturation gradients are staying exactly the same. Fortunately for us this makes the larger color picker very easy to duplicate. There are two methods to generate this gradient. The first is to create a block of DIVs or a Table with a square grid. Each block would then contain its own color starting from red at the top right to black at the bottom. This is actually the method I used several years ago the first time I created this script. If you're interested, the original script can be found Here (deleted :( ). There are several downsides to this method: The result looks rather blocky and it is slow. Fortunately there is another method. It turns out that the larger color picker can be perfectly duplicated with just two black and white gradients with a background color. One gradient is a left-right gradient that fades from white to transparent. The other is a bottom-top gradient that fades from black to transparent. Now that we know what this image is made of, we can duplicate it:
 The final image rollover to change the background color to red
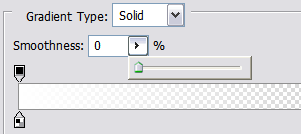 There's one thing to look out for here. When you create your gradients Photoshop automatically wants to smooth them out. Although this is generally a good thing it is detrimental to our cause here as it makes the gradients non-exact. So we need to take the smoothness slider of our gradient and turn it down to zero as in the image above. After we create our gradients we need to save the image. We want to save the image as a PNG-24 with transparency enabled. Why? This is the only web image format that allows for proper transparency. GIFs allow on/off transparency but our image has many, many levels of transparency so we go with the PNG. PNGs create a problem, however, since they do not properly work in Internet Explorer 6.0 and earlier. Fortunately we can force them to work in MSIE with the help of a style and an HTC behavior written by the talented Erik Arvidsson. The style is simple:  This requires a file called pngbehavior.htc (deleted :( ) that performs all the magic as well as a 1x1px blank gif file, blank.gif (deleted :( ), the path of which needs to be set in the .htc file. The details of the png fix won't be discussed here, but if you are interested check out the original article. Программы для работы с графикой. Автор: Mark Kahn.
Написано Август 31, 2006 Комментарии
|

О блоге |
Сайт создан в 2006 г. © injun.ru | Seoded.ru — Создание сайта